 Part one of the Lumix LX3 review gave you the tech specs, part two gets into the meat.
Look and feel
We spent an age weighing up the pros and cons of various high end compacts, finally identifying the LX3’s biggest rival as the hugely capable Canon G10.
In the end, the size advantage of the LX3 proved too compelling, with the Lumix measuring 109 x 60 x 27mm compared to the G10s pocket-busting 109 x 78 x 46mm. It weighs in substantially lighter too, at 265g compared to its rivals 350g.
Fab looks
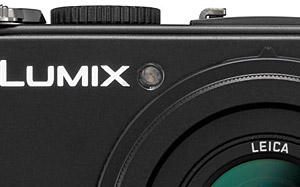
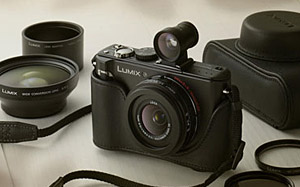
Most of all, it looks fantastic, with its retro lines, street shooter looks, traditional mode dial and sleek black and silver trimmed lines exuding quality and professionalism.
The camera screams, “pick me up and get snapping,” and it’s easy to keep a hold of, with a raised vertical strip underneath the shutter release offering a comfortable grip, with some raised dots on the back giving some extra purchase.
The camera feels solid and very well built and looks like it might take a few knocks, although we found the top mode selector dial a little plasticky for our tastes and a bit too easy to knock out of position.
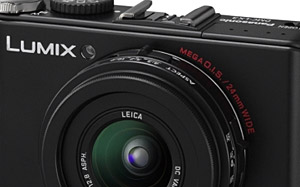
The lens barrel continues the trend first seen in the LX1 and includes a switch to adjust the aspect ratio between 4:3, 3:2 and 16:9, while another switch sets the focusing mode between AF (normal range), AF (Macro range) and Manual focus. We found the latter far more useful.
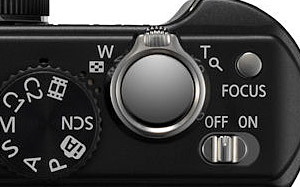
 Along the top plate is the aforementioned mode dial, hotshoe and a large silver shutter release surrounded by the rocker zoom. There’s also a handy button for auto focusing the lens in manual mode and and on/off slider switch which might be a tad difficult to operate if you’ve fingers like Bernard Matthews’ finest.
The same applies to the wee flash slider switch on the opposite end of the top plate is the pop up flash, although our delicate digits had no problems.
The mode dial offers full Program, Manual, Aperture and Shutter Priority modes, plus a setting for Panasonic’s impressive Intelligent Auto mode, plus two Custom settings, Movie Mode and a SCN option for accessing the various scene presets via an on-screen menu.
Joystick joy
The rear of the camera is dominated by the big widescreen LCD, with all the controls shunted to the right. From the top, there’s a switch for camera/viewing, an AE/AF lock and Panasonic’s natty wee joystick.
Push it in and you’ll get the Quick menu superimposed over the top of the screen, letting you quickly access functions depending on the shooting mode. For example, in Aperture or Shutter Priority modes, you can swiftly adjust the aperture and shutter settings respectively, with both parameters also being adjustable in full manual mode.
 Although some may find the joystick a little fiddly, we found it fairly fast and intuitive to use. Coal miners with shovel hands and heavyweight boxers may need to apply elsewhere, however.
Underneath the joystick is the four way controller for setting the self timer, flash mode and exposure compensation, with options to configure the down button to either review the last photo taken, adjust the film mode, sensitivity, white balance, metering, AF or Intelligent Exposure mode. An OK button sits in the middle, with a toggle display button and continuous shooting mode/delete button to the right.
The up button is particularly effective at quickly adjusting exposure compensation, and it has a twist too: press it twice and you get Auto Bracketing controls and press it again and you can access Flash Compensation settings, with parameters altered either by using the left/right buttons below, or via the joystick. OK, that’s not a twist but a push but you get what we mean.
Connecting to it
The DMC-LX3 has a small door on the right side of the body which accommodates a DC-input, a combined USB/AV port, and a component output for the optional DMW-HDC2 cable. This lets the camera output a 1080i signal for HDTVs (with HD movies scaled from their native 720p).
Under the camera there’s a single door holding the 1150mAh Lithium Ion battery pack and SD memory card slot. We found battery life to be pretty good, and still had juice left after 250 shots. Conveniently, the battery is exactly the same as the one fitted to our Ricoh GR/GX200 cameras, so – for once – we didn’t have to go out and buy more back up batteries.
Lens cap pain
 One major irritation with the LX3 is need for a removable lens cap – something we really hate. It’s easy to miss a critical moment when you’re fumbling about trying to get the lens cap off, and the lens is too vulnerable to leave it off.
This eaves you with two choices: either attach it with a bit of string and have the cap flapping about when you’re snapping or keep it unattached and risk losing it.
Happily, Ricoh came to the rescue again here, with a little bodge letting us wedge in their fantastic ‘exploding’ LC1 lens cap that automatically opens up when the lens is extended. It doesn’t look like it will work – but it does a great job!
The more details and conclusion are available in part 3 of the Lumix LX3 Review.
Comments
One response to “Lumix LX3 Review: High End Digital Compact Camera (pt. 2)”
[…] two of the Lumix LX3 review is far more detailed, getting into the guts of why we like the Lumix LX3 and what it’s like […]